PDD is designed to work with your PricePoint program, extending its functions to the tablet for service work. Invoices are built using a menu based pricing system and/or a time and materials approach with pricing originating from your PricePoint software. Invoices and payments created on the tablet are sent to the mail station and imported into your PricePoint software. Importing data is a snap! Now your business can expand without adding office overhead.
PricePoint is really good at breaking down the profit picture when you price materials, labor and extra charges. It's easy to design QuoteMagic! tasks that have the profit built in to cover your overhead: that is your successful business philosophy. Once you create a system of QuoteMagic! tasks that contain the correct profit (or load the ready made PricePoint Advantage system from Cloversoft) rest assured that your customer will be charged a fair price based on a proven profit formula. The profit built into each task allows your business to prosper as it grows!
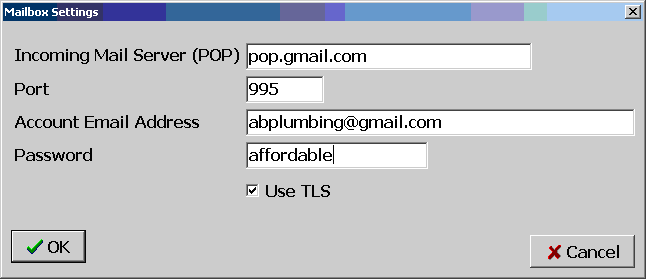
Before we start PDD for the first time we must set up an email account to receive data from our tablets. The mail station was designed for Gmail: it's free and anyone with internet has access to it.
Note: This new account should be used exclusively for the mail station, don't use it for any other purpose. Don't send any email using the account and don't register the address with any other site or program.
You'll need access to Internet Mail on your tablet to send invoices to customers and business data to the mail station.
Important: This must not be the same email address set up for the Mail Station!
From PricePoint's Main Menu find Utilities, Start Device Desktop.
There will be a slight pause as PricePoint exits and PDD starts
up.
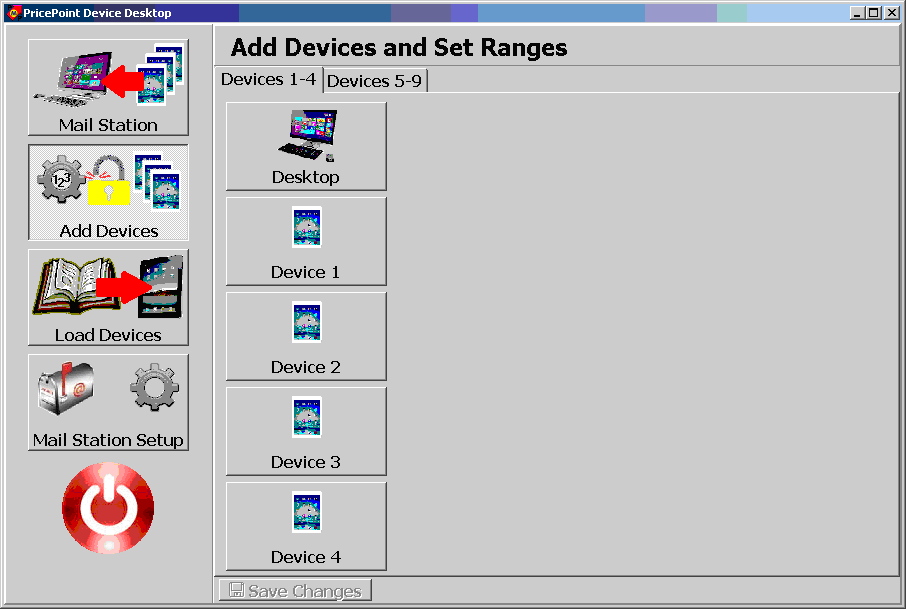
PDD can be run on up to 9 tablets. To prevent your devices and desktop computer from assigning duplicate numbers to Invoices and Customers, a range of numbers for these documents needs to be assigned to your desktop computer and devices. These ranges have been pre-set for you by PDD, but you may change them if you wish. You should give these numerical ranges some careful thought before proceeding any further, because changing them later will create complications.
Hint: It's easy to find out what your next
invoice number will be in PricePoint. From the Main Menu, click
New Invoice then pick any customer to see the next available invoice
number. To find out your next customer number, click Customer
Info and click New.
Example: Under most circumstances your desktop invoice number
will start with a zero (ie: 001192) in which case the PDD default
for Device 1 would start with 100001. This means that your PricePoint
software will be able to create 98808 invoices before it runs
into the Device 1 invoice range. At 10 invoices per day that should
last 27 years!
Keeping in mind our discussion above regarding numerical ranges, we can activate the desktop computer that will import data from your mobile devices to your PricePoint software.
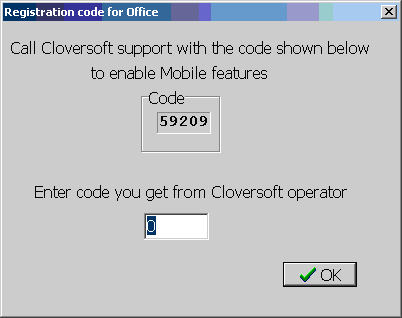
The Add Devices and Set Ranges page opens. You will need an authorization code from Cloversoft in order to activate PDD. Since authorization codes are randomly generated numbers, it is NOT possible to give you the code ahead of time, so you will need to call us while you're executing these steps. Call Cloversoft at 415-492-9211 to receive authorization codes for your desktop and for each device that you wish to use.
The pre-set ranges for desktop computer will be displayed. You can change these later (see note below).
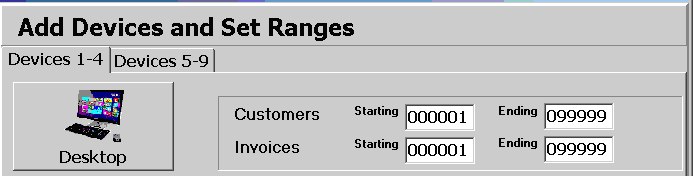

The pre-set ranges for Device 1 will be displayed. You can change
these later (see note below).
Be SURE to click Save Changes if you change
the numerical ranges.
Note: The numbering ranges shown in PDD MUST AGREE with those
loaded into your tablets! If you change the numerical range, your
must RELOAD the tablet with these settings otherwise Mail Station
will reject the data packets coming from the devices. If you find
you must change numbering ranges, be sure to click Send to Office
on the tablets and import all data left in the device BEFORE changing
ranges and reloading the device.
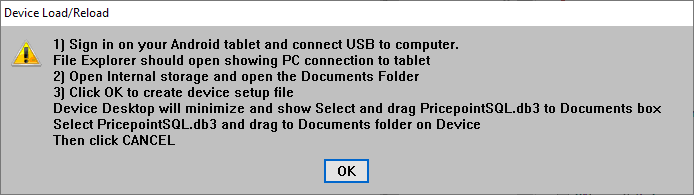
Before loading your tablet with your settings, there's a basic Android procedure that you should know. If QuoteMagic! is running on your tablet, you need to terminate the app.
This procedure sets up your tablet so that it knows its numerical range, what address to send data packets to and other basic settings. The settings are transferred to your devices through the tablet charging/data cable via iTunes.
WARNING!
Make certain that all of the information stored on the device
has been transmitted to Mail Station and has been imported before
reloading. Loading devices updates
the customer list, customer notes, Quotamatic menu pricing, before
and after approval clauses and job locations with the most current
copy of that data from your PricePoint software.
IMPORTANT!
Updates to QuoteMagic! will become available through the Play
Store from time to time. TECHNICIANS SHOULD NOT INSTALL UPDATES
AWAY FROM THE OFFICE. ALL DATA ON THE DEVICE WILL BE ERASED
when the update is installed on the device. Be absolutely sure
that all data has been sent to the office before installing the
update or you will lose valuable information! The tablet must
be reloaded after installing the update
The approval before start of work clause and the satisfactory completion clauses will be loaded into your tablets and displayed in the customer authorization dialog when the customer signs his or her name. Edit the clauses to suit your business. The default clauses are illustrated below:
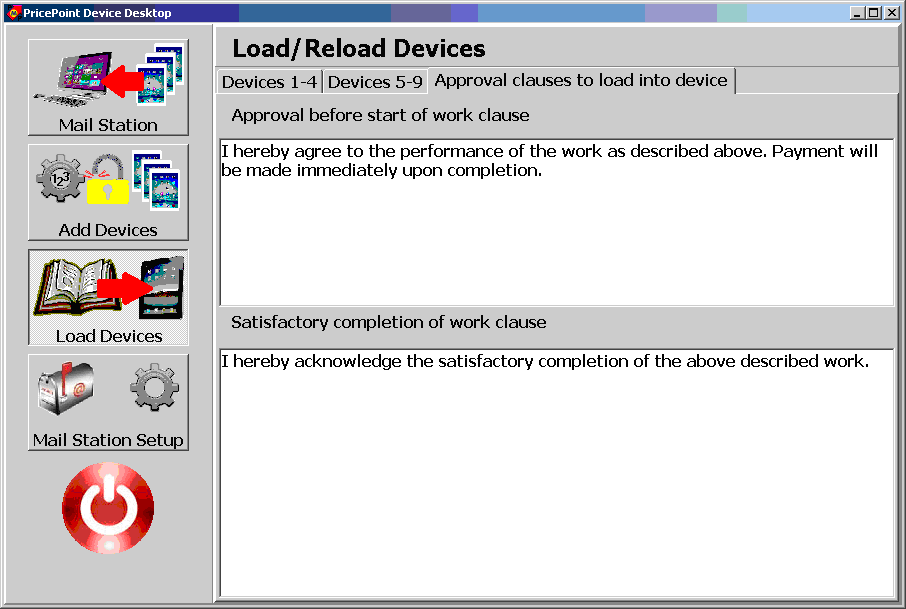
Be sure to click Save if you make changes to these clauses. The
clauses will be loaded into your tablets via iTunes the next time
you click Load Devices and click the Device (1, 2, 3 etc.) button.
There are a lot of options that determine what
items will be in your price book as well as the way that the sell
price is calculated. Let's examine them now by clicking Pricebook
Options.

Price book items start with all the items you have created shortcut codes for, much when you click Print, Price book. You can also choose to export the Hodes items by checking Add Hodes Items.
Selling Price Calculation set to Cost Plus.
Items to load on device set Hodes Items checked.
Profit % set to 35.
Use Real Prices checked.
Use Tiered Pricing checked.
 and
tap Yes. Or you can terminate QuoteMagic! (see above) and restart
it.
and
tap Yes. Or you can terminate QuoteMagic! (see above) and restart
it.
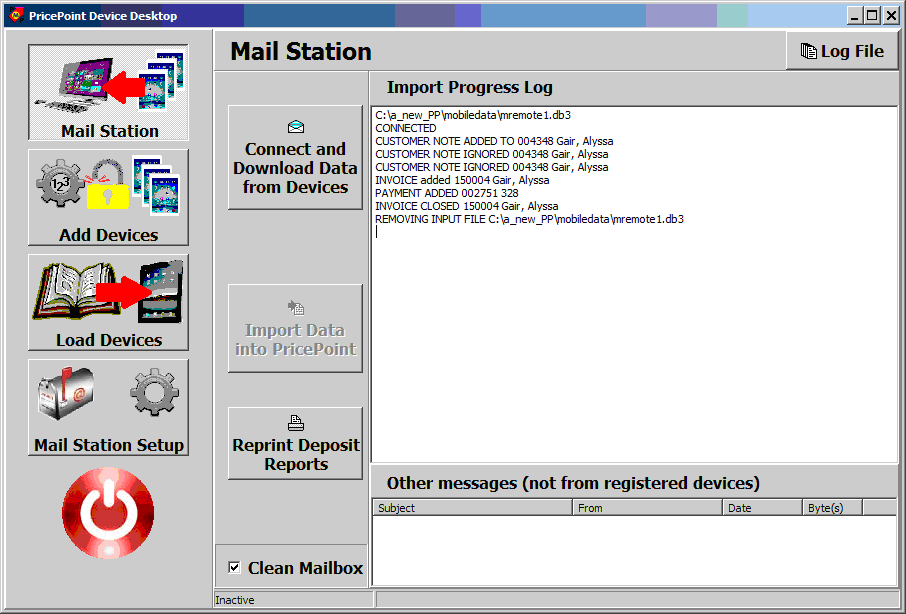
Invoices, payments and customer information flow into your PricePoint system via Mail Station. Data is emailed to Mail Station when you tap Send to Office on the tablet. Then you will open Mail Station, connect and download the data and then import the date into your PricePoint desktop software.
As the information is processed, you may be called upon to make certain decisions regarding changes to a customer note. PDD only requests your assistance when a customer note has been edited, or deleted. Edited notes have text inserted into the middle of the customer note. PDD won't ask you for a decision if changes to the note are added to the top of the note and the existing note is not changed.
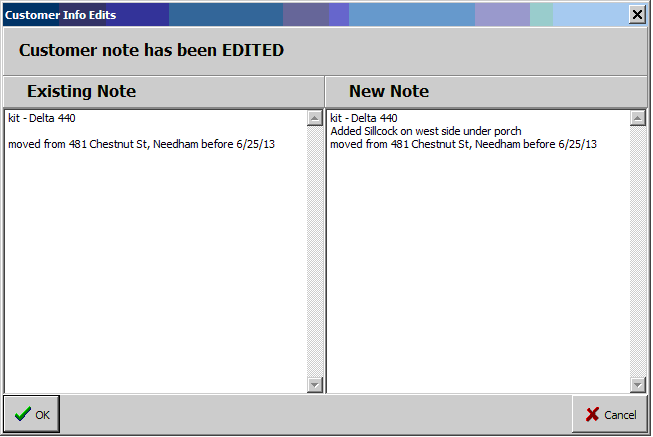 OK-Replaces
the entire customer note with the note as edited on the tablet.
OK-Replaces
the entire customer note with the note as edited on the tablet.
Cancel - Discards any customer note changes made on the
tablet.
Hint: On tablet tap Insert Date Stamp when editing the customer note. QuoteMagic! app will insert the date and the name of the mechanic that carries the tablet to make typing at the top of note easier.
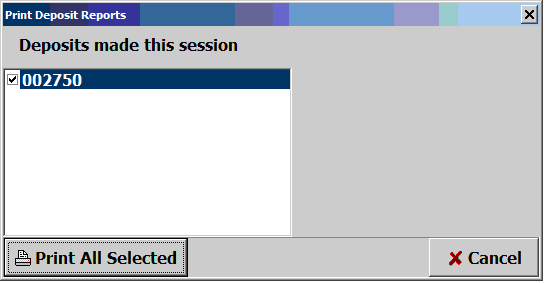 You'll
see the Print Deposit Reports dialog if payments are present in
the data packet.
You'll
see the Print Deposit Reports dialog if payments are present in
the data packet.
PDD can reprint deposit reports by clicking
Reprint Deposit Reports. You're presented with a dialog showing
the last dozen Deposit Reports in your PricePoint software. Check
the boxes of the deposit numbers you would like to reprint.
Here are some hints and tips that will come in handy while you are using PDD and QuoteMagic! app everyday.
When a data packet is present and ready to be processed, the Connect button is disabled to ensure that data is imported before connecting and downloading a new data packet.
The simplest way to get appointment information to your field techs is to use the telephone. If you have an office manager available to answer the phone then that person can make appointments and call or text the tech's cell phone with appointment information. If you have an answering service, ask them to text the contact information to the head field tech so that he can contact the customer directly.
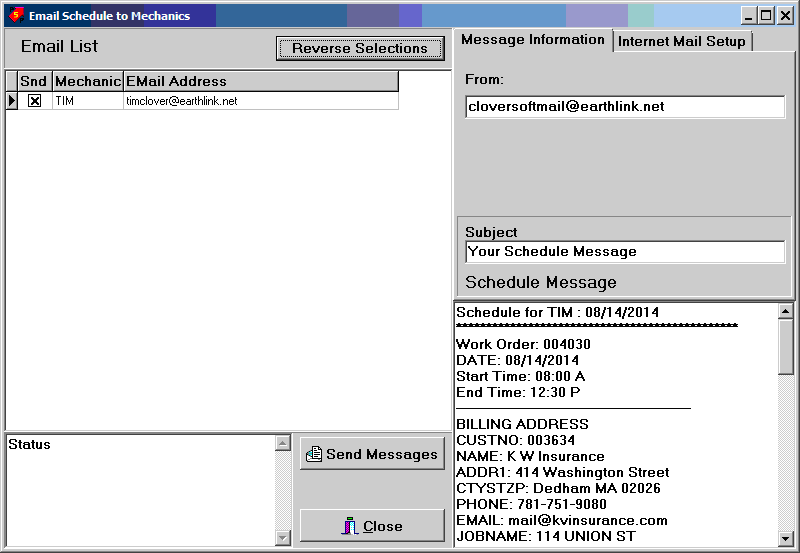
PricePoint is capable of emailing schedule summaries directly to mechanics (techs) via PricePoint's Scheduling. The mechanic carrying the tablet simply checks his email messages, looks for any with the subject Your Schedule Message and copies the body of the message and pastes it into the Appointments tab in QuoteMagic!. The app will interpret the summaries and add the appointment(s) to the Appointments tab. The tech now can select the appointment and tap Start in Workspace to begin invoicing the customer. Start in Workspace will add the customer to the workspace, select the Job Location and add any tasks contained in the summaries. The work order number is referenced so that when the invoice is imported, the work order is completed and the schedule for the work order is purged!
To send summaries to a tech in PricePoint: start Scheduling and click Print.

Select the mechanic name and click the email button
In the Email Schedule to Mechanics dialog you'll see the name
of the mechanic(s) in the list with the email address linked to
that mechanic (see Set Up Email on Your tablet above). The text
of the Schedule message is all prepared and waiting to be sent
to your mechanic(s). Click Send Messages.